

Publishing a blog post is only part of the work. There is usually an X thread to write, a LinkedIn version to prepare, a short post for Threads or Bluesky, and maybe a line for the newsletter.
Doing all of that manually can easily take another 20 to 30 minutes for every article. It is not difficult work, but it is repetitive enough that social repurposing is often the first thing to get skipped.
This guide shows how to automate that part. When a new blog post is published, the bot checks the blog's feed, sends the post to an AI model, generates the different social versions, and delivers them to Telegram, Discord, or Slack.
The whole thing runs on GitHub Actions, so there is no server to rent or program that needs to stay running. Once everything is set up, the workflow checks for new posts automatically.
There is one important limitation: the bot does not publish directly to X or LinkedIn. It writes the content and sends it to your chat, where you can review it and copy it wherever you want.
That keeps you in control and means the bot never needs access to your social accounts.
I built it as Repurpose Bot, and the steps below use it. If you'd like the finished version, you can get Repurpose Bot for $19. It's a one-time purchase with no subscription.
What the bot actually does
GitHub Actions lets GitHub run programs automatically on a schedule. In this setup, the workflow runs every six hours and checks the blog's RSS feed for new posts.
When it finds a post that has not been processed yet, it sends the content to an AI model and asks it to create the different versions.
Each version is sent as a separate message. That makes the results easier to use because the X thread, LinkedIn post, newsletter text, and other formats are not all mixed into one long message.
Four formats are enabled by default:
- X thread
- LinkedIn post
- Short post for X, Threads, and Bluesky
- Newsletter blurb
There are also six additional formats that can be enabled from the configuration:
- Threads post
- Facebook post
- Instagram caption
- Instagram carousel text
- Short-video script
- Pinterest pin
If the RSS feed only contains a short excerpt, the bot tries to open the actual blog post and read the full article. Some websites block automated requests, so if that fails, the bot falls back to the content available in the feed.
Is it worth automating?
That depends on how often you publish.
For one blog post a month, copying the article into ChatGPT and creating a few social posts manually takes only a few minutes. Setting up an automation for that probably is not worth the effort.
For a blog publishing every week or more, the calculation changes. The same small task gets repeated over and over, so the time saved adds up.
There is also another benefit. Repurposing often gets skipped simply because it is tedious. Automating the first draft makes it much easier to actually turn every new article into social content.
What you need
| What | Cost | Notes |
|---|---|---|
| GitHub account | Free | Sign up at github.com |
| An AI key (Gemini or OpenAI) | Gemini has a free tier, OpenAI needs credit | One is enough |
| A place to receive the posts | Free | Telegram, Discord or Slack. One is enough |
| A blog with an RSS feed | n/a | WordPress, Blogger, Ghost and Substack all have one |
| Repurpose Bot | $19, one time | Product page |
Finding your blog's feed address is usually simple. Try adding /feed to your blog address. On Blogger, it is usually /feeds/posts/default, while Ghost normally uses /rss/.
Open the address in your browser. If it shows a page of code containing your recent post titles, you have found the feed.
Set it up step by step
1. Create a GitHub repository and upload the files
Sign in to GitHub, click New repository, and give it a name such as repurpose-bot.
On the new repository page, choose Private.
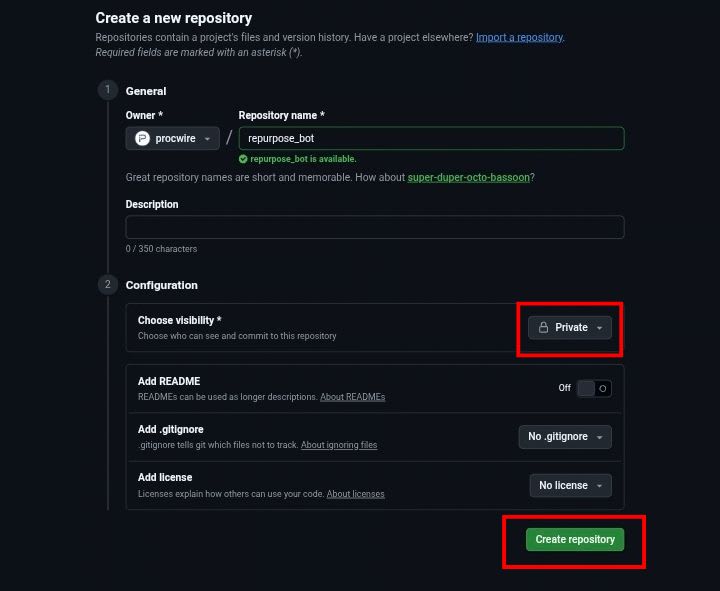
Anyone can read a public repository, including the bot's files, your settings and the list of posts it has handled.
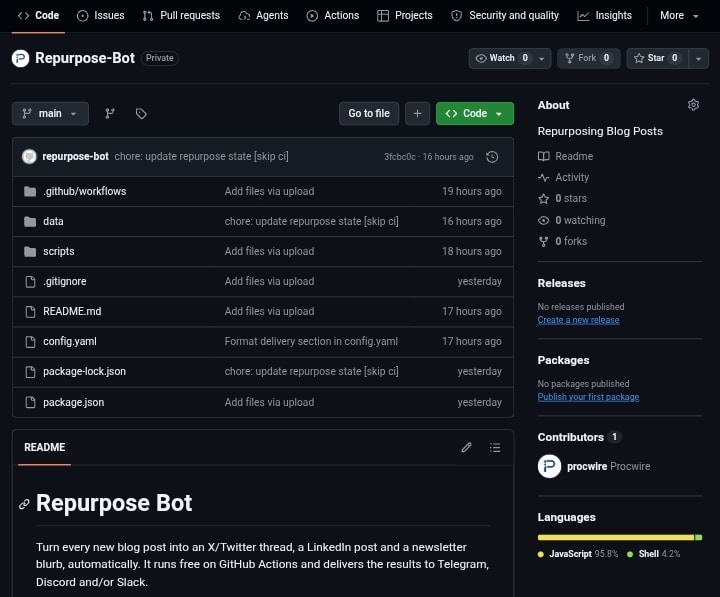
Unzip the product files on your computer. In the repository, go to Add file > Upload files and upload the files while keeping their folder structure.
Make sure the .github folder is included. Because its name starts with a dot, some file managers hide it. If the workflow does not appear in the Actions tab later, a missing .github folder is one of the first things to check.
2. Get an AI key
Only one AI provider is required.
For Gemini, open Google AI Studio, sign in with a Google account, and choose Create API key.
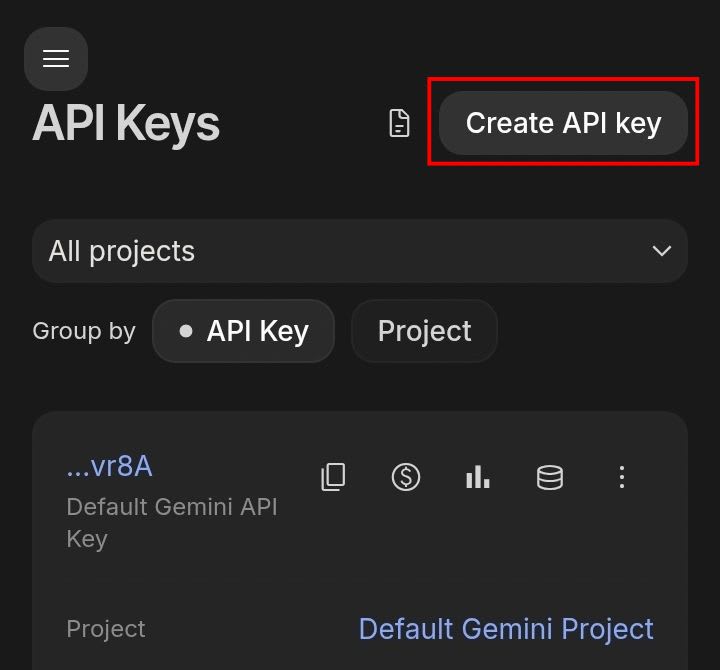
Google offers a free tier for its Flash models. The limits can change, so check what Google currently shows for your key.
On the free tier, Google may use the text you send to improve its products. The bot only sends posts that have already been published, but this is still something to consider before choosing the provider.
For OpenAI, create an API key on the OpenAI API keys page. OpenAI usually requires billing credit before the API can be used.
You can also add both keys. If both are available, the bot tries OpenAI first and uses Gemini as a backup. If OpenAI runs out of credit or rejects the request, the bot logs the problem, switches to Gemini, and continues.
3. Create a Telegram bot and find your chat ID
A Telegram bot is simply an account that a program can use to send messages.
In Telegram, search for @BotFather, click Start Bot, and message it /newbot. Follow the instructions. You will choose a name and a username ending in bot.
BotFather will then give you a token. Treat this token like a password and keep it private.
Next, find your bot by its username and send it a message such as /start. This is important because a Telegram bot cannot start a conversation with you.
Then open this address in your browser, replacing YOUR_TOKEN with your actual token:
https://api.telegram.org/botYOUR_TOKEN/getUpdatesThe page will show a block of text. Look for something similar to:
"chat":{"id":123456789The number is your chat ID.
If the page is empty, send another message to the bot and refresh the page.
For a group, add the bot to the group and send a message that mentions it. The group's chat ID will appear in the same response, and group IDs normally start with a minus sign.
4. Create a Discord webhook (optional)
A webhook is a simple way for one application to send information to another.
Discord can give you a private webhook URL. The bot sends its messages to that URL, and Discord displays them in the selected channel.
In Discord, open the settings for the channel you want to use and go to Integrations > Create Webhook. Click Copy Webhook URL.
Keep the webhook URL private. Anyone who has it can send messages to that channel.
5. Create a Slack webhook (optional)
For Slack, go to api.slack.com/apps and click Create an App. Choose From scratch, give the app a name, select your workspace, and click Create App.
Next, click Incoming Webhooks in the left sidebar and toggle it on. Click Add New Webhook to Workspace, choose a channel, and click Allow. Slack then generates a webhook URL. Copy it and keep it private, because anyone who has it can post to that channel.
6. Add your keys as GitHub Secrets
GitHub Secrets gives you a safe place to store API keys and other private values. The values are hidden from your workflow logs, so they should be used instead of putting keys directly into the configuration file.
In your repository, go to:
Settings > Secrets and variables > Actions > New repository secret
Add the secrets you need using these exact names:
GEMINI_API_KEYand/orOPENAI_API_KEYTELEGRAM_BOT_TOKENTELEGRAM_CHAT_IDDISCORD_WEBHOOK_URLSLACK_WEBHOOK_URL
You only need to add the ones for the services you are using.
Next, go to:
Settings > Actions > General > Workflow permissions
Select Read and write permissions.
The bot saves a list of posts it has already processed back to the repository. Without write permission, it can generate and send the posts but cannot save that progress, which can cause the same article to be processed again.
7. Set your feed and choose what happens on the first run
Open config.yaml in your repository and click the pencil icon to edit it.
YAML is simply a plain-text configuration format. For this setup, the most important setting is the feed address:
feed_url: "https://yourblog.com/feed"
backfill_latest: 1
The backfill_latest setting controls what happens the first time the bot runs.
You probably do not want the bot to generate social posts for every article you have ever published. This setting lets you control how many recent posts it processes on the first run.
1processes your latest article.0skips existing articles and waits for the next new post.3processes your three latest articles.- Any other number works the same way for that many recent articles.
This setting only affects the first run. After that, the bot checks for new posts.
Further down in the configuration, additional formats can be enabled by changing enabled: false to enabled: true.
The tone setting controls how the generated posts should sound.
Save your changes by committing the file.
8. Run it
Open the Actions tab in your GitHub repository.
Select Repurpose Bot and click Run workflow.
After a minute or two, the generated posts should arrive in your selected chat.
The workflow log is also useful during the first run. It shows which AI providers and delivery channels the bot found, making it easier to spot a missing or incorrectly named secret.
How often it runs
The workflow contains a schedule like this:
cron: "0 */6 * * *"That means the bot checks for new posts every six hours.
For a once-a-day schedule at 8:00 UTC, you would use:
cron: "0 8 * * *"GitHub uses UTC for scheduled workflows, and a scheduled run can start a few minutes later than the exact scheduled time.
GitHub can also pause scheduled workflows in repositories that have had no activity for a long period. If the workflow ever shows as disabled in the Actions tab, use Enable workflow to turn it back on.
Read it before you post it
The AI output is a starting point, not something to publish without checking.
It can sometimes sound generic or get a detail wrong. Reading the generated posts before publishing gives you a chance to fix those problems and make the wording sound more like your own content.
The bot also checks the length of X posts. If a generated post is too long, it asks the AI to shorten it. If the AI still cannot produce a version within the limit after several attempts, the bot sends the closest version and records the problem in the workflow log.
So if an X post looks too long, check it before copying it.
If something goes wrong
When a workflow fails, open the failed run in the Actions tab and check the log.
These are some of the messages you are most likely to see:
| What you see | What it means |
|---|---|
feed_url is still the example value | Put your real feed address in config.yaml |
No AI provider is ready | Add GEMINI_API_KEY or OPENAI_API_KEY as a secret using the exact name |
No delivery channel is ready | Add the secrets for Telegram, Discord, or Slack |
insufficient_quota or "no credits remaining" | Your OpenAI account is out of credit. The bot switches to Gemini automatically |
| Error at the "Save progress" step | Workflow permissions need to be set to Read and write |
| No workflow in the Actions tab | The .github folder was not uploaded |
| Nothing arrives in Telegram | You have not messaged the bot yet, or the chat ID is incorrect |
If you're still stuck, email contact@procwire.com with the relevant error lines from the workflow log.
What it costs
Repurpose Bot costs $19 as a one-time purchase.
GitHub includes a monthly free allowance for Actions, and a workflow that runs a few times a day uses very little of it.
The AI cost depends on the provider. Gemini's free tier may be enough for a small blog, while OpenAI's smaller models can cost only a fraction of a cent per post when an article uses a few thousand tokens.
AI pricing and free-tier limits can change, so check the provider's current pricing and terms before relying on a particular limit.
How this compares to Zapier, Make and scheduling tools
Zapier, Make, and n8n are much broader automation platforms. They connect many different apps and can be used to build workflows that publish directly to social accounts.
They also give you more flexibility, but that flexibility comes with more setup. Depending on the platform and how much you use it, you may also end up paying a recurring fee.
The cost side is covered in Zapier vs GitHub Actions for Small Business Workflows.
Scheduling tools such as Buffer solve a different part of the problem. Their main job is getting content published at the right time.
Repurpose Bot is intentionally narrower.
It takes a new blog post, creates the social versions, and sends them to you. There is no automatic publishing and no complicated workflow to maintain.
If the goal is fully automatic publishing with no human involved, a tool with direct social publishing is a better fit. For Bluesky, the Bluesky AI Automation Bot does this on a schedule, but it writes original posts from topics you choose, not from your blog posts.
If the goal is simply to remove the repetitive writing while keeping the final decision in your hands, this approach is enough.
Common questions
Does it post to X or LinkedIn automatically?
Does it work with WordPress, Blogger, Ghost or Substack?
Will it repost my old articles?
data/seen.json. The backfill_latest setting also controls how many existing posts are handled during the first run.Can I add other formats, such as an Instagram caption?
config.yaml. You can also add your own format with a few lines of configuration.Is my content sent to an AI provider?
Wrapping up
Repurposing content does not need to become another task that gets forgotten after every blog post.
The important part is not removing your judgment from the process. The bot handles the repetitive work of turning one article into several drafts, while you decide what is actually worth publishing.
For a blog that publishes regularly, that can turn a 20-minute task into a quick review and copy-and-paste job.


Comments